
Check if Pen Drive or Memory Card is Original or Fake


I found this tool interesting as I became the victim of this scam pen drives, so normally you can see people selling you these pen drives stating the size like 32Gb, 64Gb, 128Gb and many said like its capacity is 500Gb well I said ok technology is modernizing and maybe we can get that amount of space in really a small sized pen drive, but the complication's starts when they the price is just Rs. 300 Indian currency, so I was confused but I bought it and when I came home I plugged it in I started copying stuff first of all it did not write content more then 1Gb and secondly after one day it became useless.

So now this incident is from the Gaffar Market Delhi, yes it happened right over there, if you ever visit people are surely gonna ask you to but a huge space pen drive for really a cheaper price but let me tell you guys that totally a scam. So how you can re going to check if your purchased pen drive is original or fake.
Well this little tool can workout really good for you in analyzing your pen drive or memory card and giving you exact results if its space is fake or not. So now check below steps to see how this tool really works.

  1. Download h2testw.zip file.
  2. Now extract the downloaded tool and you will get the .exe file.
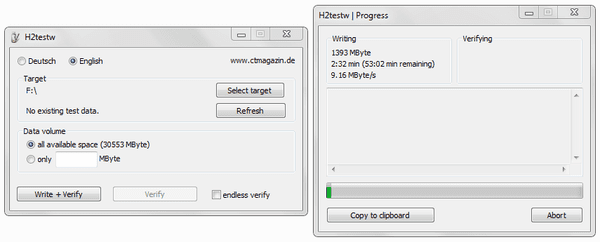
  3. Now double click on it and start this tool.
    memory-card-tester
  4. So now just choose the English from top and then click on Select Target, now choose your Pen Drive or Memory Card (make sure its formatted before using this tool.)
  5. Now just click on Write + Verify and then wait for it to complete the whole process, it will take some time according to your drive's size.
  6. Now after its complete it will show you message like complete without any errors, if you find no errors then your drive is good.
  7. But if you find errors then your drive is fake or has some problems.
That's it now you can easily check any drive, so this tool will surely help you and your friends, do comment if you find any problem :)

Comments

Popular posts from this blog

How To Root the Xolo Q700 and flash CWM Recovery

Do you want to root Xolo q700? Do you want to install CWM recovery and take backups, install custom ROMs and do more? Well, here's a step by step method to root the phone and install CWM recovery.  Requirements: The Xolo Q700 phone fully charged Download the USB and ADB drivers for the Xolo Q700 from  here  and  here Download the Motochopper rooting utility from  here Download the flash tool for the recovery from  here Download the recovery image from  here Download the necessary drivers and tools to a folder on your desktop and extract the archives to their respective folders. First, we shall root the phone and later install the CWM recovery patch. Make sure you have administrative rights on your Windows PC before you proceed. Install the necessary driver(s) Rooting the Xolo Q700 For this, we will need the USB and ADB drivers installed. Go ahead and install the drivers (usually one driver should work, but in certain cases, you would have to install bo...

How To Install Wordpress in Linux server

  Hello friend's In this session i am going to tell you how to install Worldpress in Linux server, Wordpress is open source blogging tool and CMS based on PHP and mysql which runs on a web hosting service. Wordpress is use by more then 18.9% of the top 10 million website. In order to install wp we have to configure the   web server   & mysql server. So now i am going to configure mysql database, As you can see sql database has been configured successfully and time to download Wordpress and configure the same, I already downloaded wordpress zip file, Ok guys we successfully configured the wordpress config file and added the our mysql database, user and password, all configuration done now time to move and install wordpress Go to you browser and type http://localhost (i did not configure dns server so i put localhost if you already install dns server then type you website name ) and fill required information After filling the same click to install Bingo :) wordpress ins...

How to Install CWM recovery on Samsung Galaxy Trend Plus GT S7580

Samsung  Galaxy  Trend Plus is a mid-range device, with its 1.2GHz CPU with 768MB RAM, 4-inch touchscreen display, 5MP camera and Android 4.2 firmware.   Before You Begin:  1:  Backup Your Data First. 2: Enable USB Debugging on your device. To do so, go to Settings > Applications > Development > USB debugging. The checkbox of USB Debugging should be ticked. 3: You should charge your device so that there is 30% or more amount of battery charge on your device. 4:   Download   USB Drivers  (ADB and Fastboot) for your Android device to make it compatible with Windows. Here Is The Procedure To install CWM Recovery Galaxy Trend Plus: First OF All Download Following Files: Odin307 .zip CWM_6.0.3.7_notouch_GalaxyTrendPlus_s7580_bdc_v0.2 .zip Follow The Easy Steps: 1. Extract Odin307.zip to a folder on your desktop. 2. Extract CWM_6.0.3.7_notouch_GalaxyTrendPlus_s7580_bdc_v0.2.zip to another folder on your desktop and you...