
How to get the Windows product key without using third party software

If you lost, cannot retrieve or forgot where you had stored the product key of your Windows 8.1, Windows 8 or Windows 7 OS, do not despair. I would like to show you a simple solution to extract your product key from the OS installed on your PC without using any third party software.


  1. Open Notepad.

     2. Copy and paste the following text into the notepad window 


function Get-WindowsKey {
## function to retrieve the Windows Product Key from any PC
## by Jakob Bindslet (jakob@bindslet.dk)
param ($targets = ".")
$hklm = 2147483650
$regPath = "Software\Microsoft\Windows NT\CurrentVersion"
$regValue = "DigitalProductId"
Foreach ($target in $targets) {
$productKey = $null
$win32os = $null
$wmi = [WMIClass]"\\$target\root\default:stdRegProv"
$data = $wmi.GetBinaryValue($hklm,$regPath,$regValue)
$binArray = ($data.uValue)[52..66]
$charsArray = "B","C","D","F","G","H","J","K","M","P","Q","R","T","V","W","X","Y","2","3","4","6","7","8","9"
## decrypt base24 encoded binary data
For ($i = 24; $i -ge 0; $i--) {
$k = 0
For ($j = 14; $j -ge 0; $j--) {
$k = $k * 256 -bxor $binArray[$j]
$binArray[$j] = [math]::truncate($k / 24)
$k = $k % 24
}
$productKey = $charsArray[$k] + $productKey
If (($i % 5 -eq 0) -and ($i -ne 0)) {
$productKey = "-" + $productKey
}
}
$win32os = Get-WmiObject Win32_OperatingSystem -computer $target
$obj = New-Object Object
$obj | Add-Member Noteproperty Computer -value $target
$obj | Add-Member Noteproperty Caption -value $win32os.Caption
$obj | Add-Member Noteproperty CSDVersion -value $win32os.CSDVersion
$obj | Add-Member Noteproperty OSArch -value $win32os.OSArchitecture
$obj | Add-Member Noteproperty BuildNumber -value $win32os.BuildNumber
$obj | Add-Member Noteproperty RegisteredTo -value $win32os.RegisteredUser
$obj | Add-Member Noteproperty ProductID -value $win32os.SerialNumber
$obj | Add-Member Noteproperty ProductKey -value $productkey
$obj
}
}


  • Save the text above into a file with the ".ps1" extension on the Desktop.

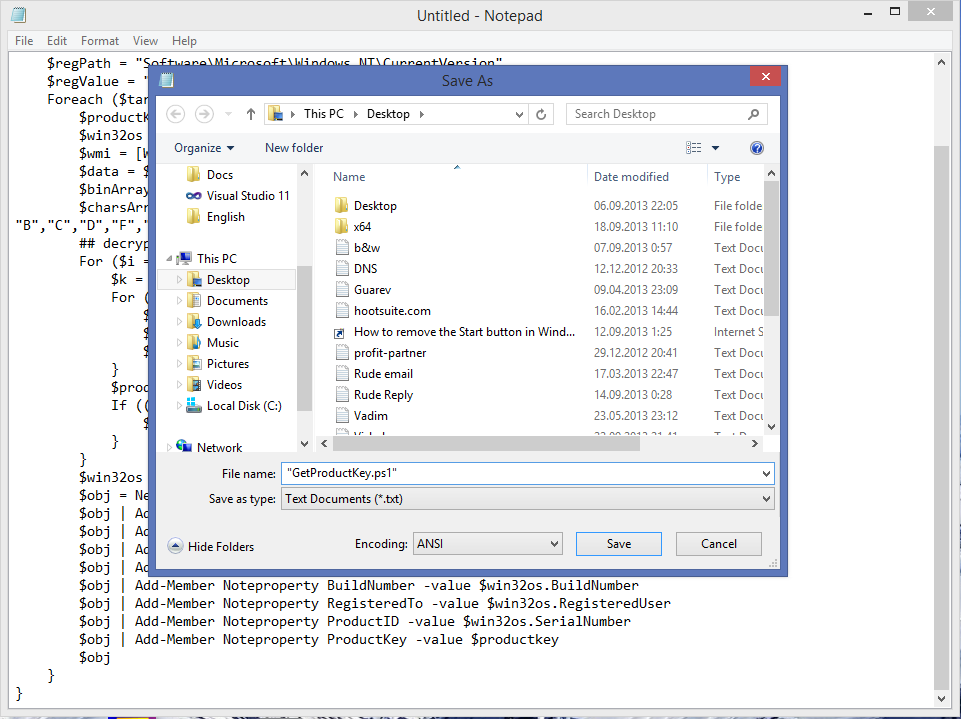
    Bonus tip: To make sure that you saving the file with the ".ps1"
    extension, you can type its name with double quotes, for
    example, "GetProductKey.ps1".

    get product key


  • Open the Powershell console as administrator by typing "powershell"
    in the search box of the Start Menu or right on the Start Screen and
    then press CTRL+SHIFT+Enter. This will open the elevated Powershell
    window.


  • Enable the execution of local files which are not digitally signed. This can be done with the following command:
    Set-ExecutionPolicy RemoteSigned
    Press Enter to allow the execution policy to be changed. Windows PowerShell
  • Now you should type the following command:
    Import-Module C:\Users\Winaero\Desktop\GetProductKey.ps1; Get-WindowsKey
    Note: Change the path to the GetProductKey.ps1 file in the command above, according to the location where you saved it.
  • Voila, you product key is displayed on the screen!
  • Get Product Key
  • Comments

    Popular posts from this blog

    How To Root the Xolo Q700 and flash CWM Recovery

    Do you want to root Xolo q700? Do you want to install CWM recovery and take backups, install custom ROMs and do more? Well, here's a step by step method to root the phone and install CWM recovery.  Requirements: The Xolo Q700 phone fully charged Download the USB and ADB drivers for the Xolo Q700 from  here  and  here Download the Motochopper rooting utility from  here Download the flash tool for the recovery from  here Download the recovery image from  here Download the necessary drivers and tools to a folder on your desktop and extract the archives to their respective folders. First, we shall root the phone and later install the CWM recovery patch. Make sure you have administrative rights on your Windows PC before you proceed. Install the necessary driver(s) Rooting the Xolo Q700 For this, we will need the USB and ADB drivers installed. Go ahead and install the drivers (usually one driver should work, but in certain cases, you would have to install bo...

    How To Install Wordpress in Linux server

      Hello friend's In this session i am going to tell you how to install Worldpress in Linux server, Wordpress is open source blogging tool and CMS based on PHP and mysql which runs on a web hosting service. Wordpress is use by more then 18.9% of the top 10 million website. In order to install wp we have to configure the   web server   & mysql server. So now i am going to configure mysql database, As you can see sql database has been configured successfully and time to download Wordpress and configure the same, I already downloaded wordpress zip file, Ok guys we successfully configured the wordpress config file and added the our mysql database, user and password, all configuration done now time to move and install wordpress Go to you browser and type http://localhost (i did not configure dns server so i put localhost if you already install dns server then type you website name ) and fill required information After filling the same click to install Bingo :) wordpress ins...

    How to Install CWM recovery on Samsung Galaxy Trend Plus GT S7580

    Samsung  Galaxy  Trend Plus is a mid-range device, with its 1.2GHz CPU with 768MB RAM, 4-inch touchscreen display, 5MP camera and Android 4.2 firmware.   Before You Begin:  1:  Backup Your Data First. 2: Enable USB Debugging on your device. To do so, go to Settings > Applications > Development > USB debugging. The checkbox of USB Debugging should be ticked. 3: You should charge your device so that there is 30% or more amount of battery charge on your device. 4:   Download   USB Drivers  (ADB and Fastboot) for your Android device to make it compatible with Windows. Here Is The Procedure To install CWM Recovery Galaxy Trend Plus: First OF All Download Following Files: Odin307 .zip CWM_6.0.3.7_notouch_GalaxyTrendPlus_s7580_bdc_v0.2 .zip Follow The Easy Steps: 1. Extract Odin307.zip to a folder on your desktop. 2. Extract CWM_6.0.3.7_notouch_GalaxyTrendPlus_s7580_bdc_v0.2.zip to another folder on your desktop and you...