How To Install Backtrack In Your System

Backtrack is Linux Based Penetration Testing Operating system which provides many inbuilt tools which are used for vulnerability assessment, exploitation and penetration testing. 
Frist Of all Boot your Backtrack From CD/DVD. Then select option for Default Text Mode. Now Let It load First. After that follow following tutorial:


Lets start with first snapshot i.e Installing of Backtrack .


Step  1 :Click On Backtrack Icon.


Step 2 : Click On Forward Button

Step 3:Select your Time Zone and press Forward button.
Step 4: Keyboard Layout: Select your layout and press Forward Button.

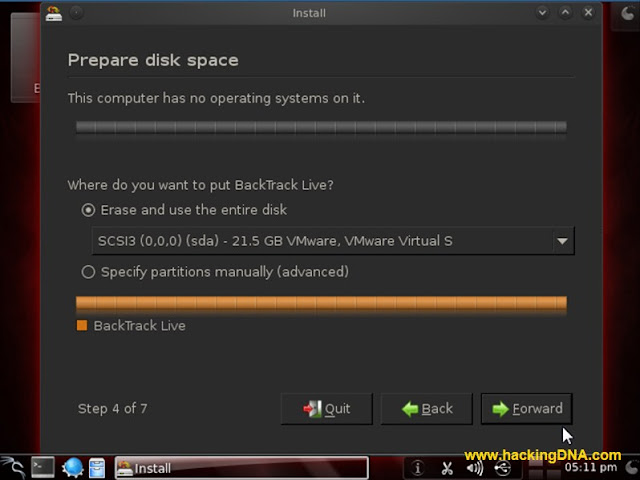
Step 5 : Now here you have 2 options 
  • Erase and use the entire disk : If you use this option it will delete your entire disk and installed  Backtrack on your harddisk  .
  • Specify partitions manually (advanced) : If you opt this option then you have to create partition on harddisk . 
Lets start from 1st Process :Erase and use the entire disk


Step 6 : Click on Install Button : In this process  no need to creating any partition on harddisk system will automatically created partition .

Second Option : Specify partitions manually (advanced)


Prepare Partitions : Select /dev/sda and click new partition . When new partition created it will look like below image -

Now new partition created now create a Linux Partitions i.e 
/  Partition (also called root ) : It is a partition where all Linux files are stored .
/boot  Partition : All the Linux Booting files are stored on Boot .
swap  Partition : It is a Virtual Memory .
Note :  Always remember that two main files are responsible for booting -

  1. GRUB(Grand Unified Boot Loader)
  2. LILO (Linux Loader)

First : create root partition and put Mount Point as / (root) and press OK

Your root created now .
 Applying same step to create /boot partition -
Select partition as : Logical
Partition Size :1000
Mount Point : /boot

Press OK
After creating /boot partition it will look like this image .
Now create a Swap Partition
The only change we have to do is in Size  and Mount Point 
Size : Give double the size of RAM 
Example : if i have 512 Ram then assigned 1024 mb of size.
Use as : Swap Area
Swap area is created . Now press Forward button


Press Install and start installation.
Installation process running in middle of the process shows this windows shown below -


Installation Process : In the middle  of installation you see this type of process going on .
Installtion Completed 
Restarted Now


Your Installation Completed
Now start Exploiting

Comments

Popular posts from this blog

How To Root the Xolo Q700 and flash CWM Recovery

Do you want to root Xolo q700? Do you want to install CWM recovery and take backups, install custom ROMs and do more? Well, here's a step by step method to root the phone and install CWM recovery.  Requirements: The Xolo Q700 phone fully charged Download the USB and ADB drivers for the Xolo Q700 from  here  and  here Download the Motochopper rooting utility from  here Download the flash tool for the recovery from  here Download the recovery image from  here Download the necessary drivers and tools to a folder on your desktop and extract the archives to their respective folders. First, we shall root the phone and later install the CWM recovery patch. Make sure you have administrative rights on your Windows PC before you proceed. Install the necessary driver(s) Rooting the Xolo Q700 For this, we will need the USB and ADB drivers installed. Go ahead and install the drivers (usually one driver should work, but in certain cases, you would have to install bo...

How To Install Wordpress in Linux server

  Hello friend's In this session i am going to tell you how to install Worldpress in Linux server, Wordpress is open source blogging tool and CMS based on PHP and mysql which runs on a web hosting service. Wordpress is use by more then 18.9% of the top 10 million website. In order to install wp we have to configure the   web server   & mysql server. So now i am going to configure mysql database, As you can see sql database has been configured successfully and time to download Wordpress and configure the same, I already downloaded wordpress zip file, Ok guys we successfully configured the wordpress config file and added the our mysql database, user and password, all configuration done now time to move and install wordpress Go to you browser and type http://localhost (i did not configure dns server so i put localhost if you already install dns server then type you website name ) and fill required information After filling the same click to install Bingo :) wordpress ins...

How to Install CWM recovery on Samsung Galaxy Trend Plus GT S7580

Samsung  Galaxy  Trend Plus is a mid-range device, with its 1.2GHz CPU with 768MB RAM, 4-inch touchscreen display, 5MP camera and Android 4.2 firmware.   Before You Begin:  1:  Backup Your Data First. 2: Enable USB Debugging on your device. To do so, go to Settings > Applications > Development > USB debugging. The checkbox of USB Debugging should be ticked. 3: You should charge your device so that there is 30% or more amount of battery charge on your device. 4:   Download   USB Drivers  (ADB and Fastboot) for your Android device to make it compatible with Windows. Here Is The Procedure To install CWM Recovery Galaxy Trend Plus: First OF All Download Following Files: Odin307 .zip CWM_6.0.3.7_notouch_GalaxyTrendPlus_s7580_bdc_v0.2 .zip Follow The Easy Steps: 1. Extract Odin307.zip to a folder on your desktop. 2. Extract CWM_6.0.3.7_notouch_GalaxyTrendPlus_s7580_bdc_v0.2.zip to another folder on your desktop and you...